FreeSewing Designs
Bee, das Bikini-Oberteil
- Bienen-Bikinioberteil: Anleitung zum Nähen
Bienen-Bikinioberteil: Design Optionen
- Bella anzeigen
- Breite des Brustbandes
- Breite des Nackenträgers
- Brustumfangszugabe
- Bänder
- Büstenumfang leicht
- Farben des Nackenträgers
- Gekreuzte Rückenträger
- Hohe Brustweite (Bella)
- Höhe der Rückenabnäher (Bella)
- Leichtigkeit von Schulter zu Schulter (Bella)
- Länge der gekreuzten Rückenträger
- Länge des Brustbandes
- Länge des Nackenträgers
- Obere Tiefe
- Seitliche Kurve
- Seitliche Tiefe
- Spitz zulaufende Krawattenenden
- Taillenzugabe
- Tiefe des vorderen Armlochdrehpunktes (Bella)
- Tiefen des Armloches (Bella)
- Umkehrbar
- Untere Tiefe
- Vollständige Brustverkleinerung (Bella)
- Vordere Kurve
- Vordere Schulterbreite (Bella)
- Zweifarbige Krawatten
- Bienen-Bikinioberteil: Designer Notes
- Bienen-Bikinioberteil: Erforderliche Maße
- Bienen-Bikinioberteil: Schnittanleitung
- Bienen-Bikinioberteil: Stoff Optionen
- Bienen-Bikinioberteil: Was du brauchst
Bella, ein Grundschnitt
Bella Body Block: Design Optionen
- Armlochtiefe
- Ausschnitt im Nacken
- Brustumfangszugabe
- Büstendart-Kurve
- Büstenumfang leicht
- Front-Armloch-Tiefe
- Hintere Armlochkrümmung
- Hintere Armlochschiebung
- Hinterer Saum Hang
- Hohe Büstenbreite
- Länge des Brustabnähers
- Länge des Taillenabnähers
- Rückenarmloch-Tiefe
- Rückseitendart-Höhe
- Taillenzugabe
- Verringerung der Brustumfangszugabe
- Vordere Armlochkrümmung
- Vordere Schulterbreite
- Zugabe des Schulterabstandes
- Bella Body Block: Designer-Notizen
- Bella Body Block: Erforderliche Maße
- Bella Body Block: Stoff-Optionen
- Bella Body Block: Was du brauchst
- Bella Körperblock: Anleitung zum Nähen
- Bella Körperblock: Schneideanleitung
Bent, ein Grundschnitt
- Gebogener Körper Block: Anleitung zum Nähen
- Gebogener Körper Block: Anleitung zum Schneiden
- Gebogener Körper Block: Designer-Notizen
- Gebogener Körper Block: Erforderliche Maße
Gebogener Körper Block: Gestaltungsmöglichkeiten
- Armkugel Höhe
- Armkugel Zugabe
- Armlochtiefe
- Ausschnitt im Nacken
- Bizeps Zugabe
- Brustumfangszugabe
- Kragen Zugabe
- Legacy Armlochtiefe
- Längenzugabe
- Manschette Zugabe
- Rückenweitenverhältnis
- Schnittkonstruktion für Oberbrustumfang
- Schulter Zugabe
- Schulternahtverschiebung: Armlochseite
- Schulternahtverschiebung: Kragenseite
- Tiefenfaktor des Armloches
- Verringerung der Schulterneigung
- Zusätzlicher Ausschnitt am vorderen Armloch
- Ärmel Längenzugabe
- Ärmelkrümmung
- Gebogener Körper Block: Stoffoptionen
- Gebogener Körperblock: Was du brauchst
Breanna, ein Grundschnitt
- Breanna Body Block: Designer Notes
- Breanna Body Block: Stoff Optionen
- Breanna Körperblock: Anleitung zum Nähen
- Breanna Körperblock: Anleitung zum Schneiden
Breanna Körperblock: Design Optionen
- Armkugel Hinten X
- Armkugel Hinten Y
- Armkugel Oben X
- Armkugel Oben Y
- Armkugel Q1 Spreizung nach oben
- Armkugel Q1 Spreizung nach unten
- Armkugel Q2 Spreizung nach oben
- Armkugel Q2 Spreizung nach unten
- Armkugel Q3 Spreizung nach oben
- Armkugel Q3 Spreizung nach unten
- Armkugel Q4 Spreizung nach oben
- Armkugel Q4 Spreizung nach unten
- Armkugel Vorne X
- Armkugel Vorne Y
- Armkugel Zugabe
- Ausschnitt im Nacken
- Bizeps Zugabe
- Brustabnäher
- Brustumfangszugabe
- Formgebung der Brustabnäher
- Größe der Schulterabnäher
- Größe des Taillenabnähers
- Kragen Zugabe
- Länge des Brustabnähers
- Länge des Schulterabnähers
- Länge des Taillenabnähers
- Länge des sekundären Brustabnähers
- Manschette Zugabe
- Offset der Armkugel Q1
- Offset der Armkugel Q2
- Offset der Armkugel Q3
- Offset der Armkugel Q4
- Rückenweitenverhältnis
- Schulter Zugabe
- Schulterabnäher
- Sekundärer Brustabnäher
- Taillenabnäher
- Taillenzugabe
- Tiefenfaktor des Armloches
- Verringerung der Schulterneigung
- Vertikale Zugabe
- Vorderer Armlochabnäher
- Zusätzlicher Ausschnitt am vorderen Armloch
- Ärmel Längenzugabe
- Breanna Körperblock: Erforderliche Maße
- Breanna Körperblock: Was du brauchst
Brian, ein Grundschnitt
- Brian Body Block: Anleitung zum Schneiden
- Brian Body Block: Designer-Notizen
- Brian Body Block: Erforderliche Maße
Brian Body Block: Gestaltungsmöglichkeiten
- Armkugel Hinten X
- Armkugel Hinten Y
- Armkugel Oben X
- Armkugel Oben Y
- Armkugel Q1 Spreizung nach oben
- Armkugel Q1 Spreizung nach unten
- Armkugel Q2 Spreizung nach oben
- Armkugel Q2 Spreizung nach unten
- Armkugel Q3 Spreizung nach oben
- Armkugel Q3 Spreizung nach unten
- Armkugel Q4 Spreizung nach oben
- Armkugel Q4 Spreizung nach unten
- Armkugel Vorne X
- Armkugel Vorne Y
- Armkugel Zugabe
- Armlochtiefe
- Ausschnitt im Nacken
- Bizeps Zugabe
- Brustumfangszugabe
- Garantie der Ärmelbreite
- Kragen Zugabe
- Legacy Armlochtiefe
- Längenzugabe
- Manschette Zugabe
- Offset der Armkugel Q1
- Offset der Armkugel Q2
- Offset der Armkugel Q3
- Offset der Armkugel Q4
- Rückenweitenverhältnis
- Schnittkonstruktion für Oberbrustumfang
- Schulter Zugabe
- Schulternahtverschiebung: Armlochseite
- Schulternahtverschiebung: Kragenseite
- Tiefenfaktor des Armloches
- Verringerung der Schulterneigung
- Zusätzlicher Ausschnitt am vorderen Armloch
- Ärmel Längenzugabe
- Brian Body Block: Stoffoptionen
- Brian Körperblock: Anleitung zum Nähen
- Brian Körperblock: Was du brauchst
Carlita, der Mantel
- Carlita Mantel: Anleitung zum Nähen
Carlita Mantel: Design Optionen
- Armkugel Höhe
- Armkugel Zugabe
- Armlochtiefe
- Ausschnitt im Nacken
- Bizeps Zugabe
- Brusttaschenbreite
- Brusttaschenhöhe
- Brusttaschenwinkel
- Brustumfangszugabe
- Gürteilbreite
- Horizontale Taschenplatzierung
- Horizontaler Knopfabstand
- Innentasche Rahmenhöhe
- Innentaschenbreite
- Innentaschenplatzierung
- Innentaschentiefe
- Kontur
- Kragen ausgebreitet
- Kragenausstellung
- Kragenhöhe
- Legacy Armlochtiefe
- Länge
- Manschette Zugabe
- Manschettenlänge
- Platzierung der Brusttasche
- Reversverkleinerung
- Rückenweitenverhältnis
- Schulter Zugabe
- Schulternahtverschiebung: Armlochseite
- Schulternahtverschiebung: Kragenseite
- Taillenzugabe
- Taschenbreite
- Taschenhöhe
- Taschenlaschenradius
- Taschenradius
- Tiefenfaktor des Armloches
- Verringerung der Schulterneigung
- Vertikale Taschenplatzierung
- Zugabe Gesäß
- Zusätzlicher Ausschnitt am vorderen Armloch
- Ärmel Längenzugabe
- Ärmelkrümmung
- Übertritt vorne
- Carlita Mantel: Designer Notes
- Carlita Mantel: Erforderliche Maße
- Carlita Mantel: Schnittanleitung
- Carlita Mantel: Stoff Optionen
- Carlita Mantel: Was du brauchst
Carlton, der Mantel
- Carlton Mantel: Anleitung zum Nähen
Carlton Mantel: Design Optionen
- Armkugel Höhe
- Armkugel Zugabe
- Armlochtiefe
- Ausschnitt im Nacken
- Bizeps Zugabe
- Brusttaschenbreite
- Brusttaschenhöhe
- Brusttaschenwinkel
- Brustumfangszugabe
- Gürteilbreite
- Horizontale Taschenplatzierung
- Horizontaler Knopfabstand
- Innentasche Rahmenhöhe
- Innentaschenbreite
- Innentaschenplatzierung
- Innentaschentiefe
- Kragen ausgebreitet
- Kragenausstellung
- Kragenhöhe
- Legacy Armlochtiefe
- Länge
- Manschette Zugabe
- Manschettenlänge
- Platzierung der Brusttasche
- Reversverkleinerung
- Rückenweitenverhältnis
- Schnittkonstruktion für Oberbrustumfang
- Schulter Zugabe
- Schulternahtverschiebung: Armlochseite
- Schulternahtverschiebung: Kragenseite
- Taillenzugabe
- Taschenbreite
- Taschenhöhe
- Taschenlaschenradius
- Taschenradius
- Tiefenfaktor des Armloches
- Verringerung der Schulterneigung
- Vertikale Taschenplatzierung
- Zugabe Gesäß
- Zusätzlicher Ausschnitt am vorderen Armloch
- Ärmel Längenzugabe
- Ärmelkrümmung
- Übertritt vorne
- Carlton Mantel: Designer Notes
- Carlton Mantel: Erforderliche Maße
- Carlton Mantel: Schnittanleitung
- Carlton Mantel: Stoff Optionen
- Carlton-Mantel: Was du brauchst
Charlie, die Chinos
- Charlie Chinos: Anleitung zum Nähen
Charlie Chinos: Design Optionen
- Beginn der Schrittnahtkurve
- Bein-Balance
- Besatz der hinteren Tasche
- Breite der Fronttasche
- Breite der hinteren Tasche
- Crotch Naht Biegen
- Flugkurve
- Fluglänge
- Fly width
- Fronttasche
- Fronttasche Schrägbreite
- Gürtelschlaufen
- Horizontale Platzierung der hinteren Tasche
- Knie-Zugabe
- Längenzugabe
- Position Fadenlauf
- Quernaht Kurve
- Quernaht Winkel
- Schneckennaht Winkel
- Schritt-Tiefe
- Start der Quernahtkurve
- Taillenband Kurve
- Taillenbilanz
- Taillenbundweite
- Taillenhöhe
- Taillenzugabe
- Tiefe der Vordertasche
- Tiefe der hinteren Tasche
- Vertikale Platzierung der hinteren Tasche
- Vordertasche Schrägtiefe
- Vordertaschenschlitzrunde
- Vordertaschenschräg Biegen
- Zugabe Gesäß
- Charlie Chinos: Designer Notes
- Charlie Chinos: Erforderliche Maße
- Charlie Chinos: Schnittanleitung
- Charlie Chinos: Stoff Optionen
- Charlie Chinos: Was du brauchst
Diana, das drapierte Oberteil
- Diana drapiertes Oberteil: Anleitung zum Nähen
Diana drapiertes Oberteil: Design Optionen
- Armkugel Hinten X
- Armkugel Hinten Y
- Armkugel Oben X
- Armkugel Oben Y
- Armkugel Q1 Spreizung nach oben
- Armkugel Q1 Spreizung nach unten
- Armkugel Q2 Spreizung nach oben
- Armkugel Q2 Spreizung nach unten
- Armkugel Q3 Spreizung nach oben
- Armkugel Q3 Spreizung nach unten
- Armkugel Q4 Spreizung nach oben
- Armkugel Q4 Spreizung nach unten
- Armkugel Vorne X
- Armkugel Vorne Y
- Armkugel Zugabe
- Armlochtiefe
- Bizeps Zugabe
- Brustumfangszugabe
- Fallwinkel
- Garantie der Ärmelbreite
- Legacy Armlochtiefe
- Längenzugabe
- Manschette Zugabe
- Offset der Armkugel Q1
- Offset der Armkugel Q2
- Offset der Armkugel Q3
- Offset der Armkugel Q4
- Rückenweitenverhältnis
- Schnittkonstruktion für Oberbrustumfang
- Schulter Zugabe
- Schulternahtlänge
- Taillenzugabe
- Tiefenfaktor des Armloches
- Zugabe Hüfte
- Zusätzlicher Ausschnitt am vorderen Armloch
- Ärmel Längenzugabe
- Diana drapiertes Oberteil: Designer Notes
- Diana drapiertes Oberteil: Erforderliche Maße
- Diana drapiertes Oberteil: Schnittanleitung
- Diana drapiertes Oberteil: Stoff Optionen
- Diana drapiertes Oberteil: Was du brauchst
Huey, der Hoodie
- Huey Hoodie: Anleitung zum Nähen
Huey Hoodie: Design Optionen
- Armkugel Hinten X
- Armkugel Hinten Y
- Armkugel Oben X
- Armkugel Oben Y
- Armkugel Q1 Spreizung nach oben
- Armkugel Q1 Spreizung nach unten
- Armkugel Q2 Spreizung nach oben
- Armkugel Q2 Spreizung nach unten
- Armkugel Q3 Spreizung nach oben
- Armkugel Q3 Spreizung nach unten
- Armkugel Q4 Spreizung nach oben
- Armkugel Q4 Spreizung nach unten
- Armkugel Vorne X
- Armkugel Vorne Y
- Armkugel Zugabe
- Armlochtiefe
- Ausschnitt im Nacken
- Bizeps Zugabe
- Brustumfangszugabe
- Bündchen
- Bündchen-Elastizität
- Bündchen-Höhe
- Garantie der Ärmelbreite
- Kapuzenausschnitt
- Kapuzenhöhe
- Kapuzentiefe
- Kapuzenverschluss
- Kragen Zugabe
- Legacy Armlochtiefe
- Längenzugabe
- Manschette Zugabe
- Offset der Armkugel Q1
- Offset der Armkugel Q2
- Offset der Armkugel Q3
- Offset der Armkugel Q4
- Rückenweitenverhältnis
- Schnittkonstruktion für Oberbrustumfang
- Schulter Zugabe
- Schulternahtverschiebung: Armlochseite
- Schulternahtverschiebung: Kragenseite
- Tasche
- Taschenbreite
- Taschenhöhe
- Tiefenfaktor des Armloches
- Verringerung der Schulterneigung
- Winkel der Kapuze
- Zugabe Hüfte
- Zusätzlicher Ausschnitt am vorderen Armloch
- Ärmel Längenzugabe
- Huey Hoodie: Designer Notes
- Huey Hoodie: Schnittanleitung
- Huey Hoodie: Stoff Optionen
- Huey Hoodie: Was du brauchst
- Huey Kapuzenpulli: Erforderliche Maße
Jaeger, das Sakko
- Jaeger Jacke: Anleitung zum Nähen
Jaeger Jacke: Design Optionen
- Abnäher in der hinteren Mitte
- Anzahl der Knöpfe
- Armkugel Höhe
- Armkugel Zugabe
- Armlochtiefe
- Ausschnitt im Nacken
- Bizeps Zugabe
- Breite der Fronttasche
- Brustformung
- Brusttasche Rahmengröße
- Brusttasche Tiefe
- Brusttaschenbreite
- Brusttaschenwinkel
- Brustumfangszugabe
- Frontschnittwinkel
- Fronttaschenplatzierung
- Hinterer Gehschlitz
- Hinterer Gehschlitz Länge
- Innentasche Rahmenhöhe
- Innentaschenbreite
- Innentaschenplatzierung
- Innentaschentiefe
- Knopflänge
- Kragen Zugabe
- Kragen ausgebreitet
- Kragenhöhe
- Kragenrolle
- Kragenrückkehr
- Kragentiefe
- Kragenwinkel
- Legacy Armlochtiefe
- Längenzugabe
- Manschette Zugabe
- Platzierung der Brusttasche
- Platzierung des vorderen Abnähers
- Radius der Vordertasche
- Revers Beginn
- Reversverkleinerung
- Rollkragenhöhe
- Rückenweitenverhältnis
- Saumabfall in der Mitte
- Saumradius
- Schnittkonstruktion für Oberbrustumfang
- Schulter Zugabe
- Seitliche / vordere Platzierung
- Stern vorne
- Taillenzugabe
- Taschenfalte
- Tiefe der Vordertasche
- Tiefenfaktor des Armloches
- Verringerung der Schulterneigung
- Vorderes Cutaway-Ende
- Zugabe Hüfte
- Zusätzlicher Ausschnitt am vorderen Armloch
- Ärmel Längenzugabe
- Ärmelkrümmung
- Ärmellüftungslänge
- Ärmelschlitzbreite
- Übertritt vorne
- Jaeger Jacke: Designer Notes
- Jaeger Jacke: Erforderliche Maße
- Jaeger Jacke: Schnittanleitung
- Jaeger Jacke: Stoff Optionen
- Jaeger Jacke: Was du brauchst
Noble, ein Grundschnitt
Edler Karosserieblock: Gestaltungsmöglichkeiten
- Armloch Abnäher Position
- Armlochtiefe
- Ausschnitt im Nacken
- Brustumfangszugabe
- Büstenumfang leicht
- Front-Armloch-Tiefe
- Hintere Armlochkrümmung
- Hintere Armlochschiebung
- Hinterer Saum Hang
- Hohe Büstenbreite
- Länge des Taillenabnähers
- Obere Abnäherlänge
- Position Abnäher
- Rückenarmloch-Tiefe
- Rückseitendart-Höhe
- Schulter Abnäher Position
- Schulter-zu-Schulter-Erleichterung
- Taillenzugabe
- Verringerung der Brustumfangszugabe
- Vordere Armlochkrümmung
- Vordere Schulterbreite
- Waist dart position
- Edler Körperblock: Anleitung zum Nähen
- Edler Körperblock: Anleitung zum Schneiden
- Edler Körperblock: Designer-Notizen
- Edler Körperblock: Erforderliche Maße
- Edler Körperblock: Stoff Optionen
- Noble Body Block: Was du brauchst
Onyx Einteiler
- Onyx Einteiler: Designer-Notizen
- Onyx Einteiler: Was du brauchst
- Onyx Einteilig: Anleitung zum Schneiden
Onyx Einteilig: Design Optionen
- Bein Saum Leichtigkeit
- Beinlänge
- Beinrippung
- Beinsaum
- Bequemlichkeitszugabe Ärmel
- Breite der Beinrippen
- Breite der Ärmelrippung
- Breite des Reißverschlussschutzes
- Breite des Rocks
- Brustumfangszugabe
- Bund des Rocks
- Hals Stil
- Hoodfrontbonus
- Hoodfrontdip
- Kapuzenhöhe
- Kapuzensaum
- Kapuzentiefe
- Leichtigkeit der Mittelnaht
- Leichtigkeit im Handgelenk
- Leichtigkeit im Nacken
- Leichtigkeit im Oberschenkel
- Leichtigkeit unter den Achseln
- Länge Nackenband
- Länge der Beinrippen
- Länge der Ärmelrippung
- Länge des Reißverschlusses
- Länge des Rocks
- Nackenband Breite
- Nackenschutzlänge
- Outseam ease
- Position am Hals
- Position der Beinverjüngung
- Raglan Schaufeltiefe
- Raglan-Schaufellänge
- Rock
- Rocksaum
- Taillenzugabe
- Vorderseite auf Falz
- Zipper position
- Zugabe Gesäß
- Zugabe Hüfte
- Zurück auf Falz
- Zwickelweite im Schritt
- Ärmellänge
- Ärmellänge
- Ärmelrippung
- Ärmelsaum
- Onyx Einteilig: Erforderliche Maße
- Onyx Einteilig: Stoff Optionen
- Onyx einteilig: Anleitung zum Nähen
Paco, die Hose
- Paco Hose: Erforderliche Maße
- Paco Hose: Stoff Optionen
- Paco Hosen: Anleitung zum Nähen
Paco Hosen: Design Optionen
- Beginn der Schrittnahtkurve
- Bein-Balance
- Bequemlichkeitszugabe Ferse
- Crotch Naht Biegen
- Elastische Manschette
- Gesäßtaschen
- Knöchel/Saum Gummizugbreite
- Längenzugabe
- Position Fadenlauf
- Quernaht Kurve
- Quernaht Winkel
- Schneckennaht Winkel
- Schritt-Tiefe
- Start der Quernahtkurve
- Taillenbilanz
- Taillenbundweite
- Taillenhöhe
- Taillenzugabe
- Vordere Taschen
- Zugabe Gesäß
- Paco Hosen: Designer Notes
- Paco Hosen: Schnittanleitung
- Paco Hosen: Was du brauchst
Penelope, der Bleistiftrock
- Penelope Bleistiftrock: Anleitung zum Nähen
Penelope Bleistiftrock: Design Optionen
- Abnäher zu Seitennaht Faktor
- Anzahl Abnäher
- Breite des Taillenbundes
- Gebogene Abnäher
- Hinterer Gehschlitz
- Hinterer Gehschlitz Länge
- Höhe des Saumes
- Längenzugabe
- Platzierung Reißverschluss
- Saumzugabe
- Taillenbund
- Taillenzugabe
- Vorderer Abnäherinhälttiefenfaktor
- Zugabe Gesäß
- Zurück zum Abnäherinhalttiefenfaktor
- Überlappung des Taillenbands
- Penelope Bleistiftrock: Designer Notes
- Penelope Bleistiftrock: Erforderliche Maße
- Penelope Bleistiftrock: Schnittanleitung
- Penelope Bleistiftrock: Stoff Optionen
- Penelope Bleistiftrock: Was du brauchst
Simon, das Hemd
Simon Hemd: Design Optionen
- Anzahl der Knöpfe
- Armkugel Hinten X
- Armkugel Hinten Y
- Armkugel Oben X
- Armkugel Oben Y
- Armkugel Q1 Spreizung nach oben
- Armkugel Q1 Spreizung nach unten
- Armkugel Q2 Spreizung nach oben
- Armkugel Q2 Spreizung nach unten
- Armkugel Q3 Spreizung nach oben
- Armkugel Q3 Spreizung nach unten
- Armkugel Q4 Spreizung nach oben
- Armkugel Q4 Spreizung nach unten
- Armkugel Vorne X
- Armkugel Vorne Y
- Armkugel Zugabe
- Armlochtiefe
- Ausschnitt im Nacken
- Bizeps Zugabe
- Brustumfangszugabe
- Flachgeplagte Naht erlaubt
- Formgebung der hinteren Abnäher
- Freie Länge Knopf
- Garantie der Ärmelbreite
- Geteilte Passe
- Hintere Abnäher
- Kellerfalte
- Kellerfalte Falz
- Kellerfaltenweite
- Knopfleiste Breite
- Knopfleiste Stil
- Knopflochleiste Breite
- Knopflochleiste Falzbreite
- Knopflochleiste Stil
- Kragen Zugabe
- Kragenausstellung
- Kragenkrümmung
- Kragenlücke
- Kragenrolle
- Kragenstegbiegung
- Kragenstegbreite
- Kragenstegkrümmung
- Kragenwinkel
- Legacy Armlochtiefe
- Längenzugabe
- Manschette Zugabe
- Manschette drapieren
- Manschette schmaler Knopf
- Manschettenknopfreihen
- Manschettenlänge
- Manschettenstil
- Offset der Armkugel Q1
- Offset der Armkugel Q2
- Offset der Armkugel Q3
- Offset der Armkugel Q4
- Passenhöhe
- Runder Rücken
- Rückenweitenverhältnis
- Saumkurve
- Saumstil
- Schnittkonstruktion für Oberbrustumfang
- Schulter Zugabe
- Schulternahtverschiebung: Armlochseite
- Schulternahtverschiebung: Kragenseite
- Separate Knopfleiste
- Separate Knopfleiste
- Separate Knopflochleiste
- Separate Knopflochleiste
- Taillenzugabe
- Tiefenfaktor des Armloches
- Verringerung der Schulterneigung
- Zugabe Hüfte
- Zusätzlicher Ausschnitt am vorderen Armloch
- Zusätzlicher oberer Knopf
- Ärmel Längenzugabe
- Ärmelleiste Breite
- Ärmelleistenlänge
- Simon Hemd: Designer Notes
- Simon Hemd: Stoff Optionen
- Simon Shirt: Anleitung zum Nähen
- Simon Shirt: Erforderliche Maße
- Simon Shirt: Schnittanleitung
- Simon-Hemd: Was du brauchst
Simone, das Hemd
- Simone Hemd: Designer Notes
- Simone Hemd: Stoff Optionen
- Simone Shirt: Anleitung zum Nähen
Simone Shirt: Design Optionen
- Anzahl der Knöpfe
- Armkugel Hinten X
- Armkugel Hinten Y
- Armkugel Oben X
- Armkugel Oben Y
- Armkugel Q1 Spreizung nach oben
- Armkugel Q1 Spreizung nach unten
- Armkugel Q2 Spreizung nach oben
- Armkugel Q2 Spreizung nach unten
- Armkugel Q3 Spreizung nach oben
- Armkugel Q3 Spreizung nach unten
- Armkugel Q4 Spreizung nach oben
- Armkugel Q4 Spreizung nach unten
- Armkugel Vorne X
- Armkugel Vorne Y
- Armkugel Zugabe
- Armlochtiefe
- Auf Brusthöhe ausgerichtete Knöpfe
- Ausschnitt im Nacken
- Bizeps Zugabe
- Brustumfangszugabe
- Flachgeplagte Naht erlaubt
- Formgebung der hinteren Abnäher
- Freie Länge Knopf
- Garantie der Ärmelbreite
- Geteilte Passe
- Hintere Abnäher
- Kellerfalte
- Kellerfalte Falz
- Kellerfaltenweite
- Knopfleiste Breite
- Knopfleiste Stil
- Knopflochleiste Breite
- Knopflochleiste Falzbreite
- Knopflochleiste Stil
- Kontur
- Kragen Zugabe
- Kragenausstellung
- Kragenkrümmung
- Kragenlücke
- Kragenrolle
- Kragenstegbiegung
- Kragenstegbreite
- Kragenstegkrümmung
- Kragenwinkel
- Legacy Armlochtiefe
- Länge der vorderen Abnäher
- Länge des Brustabnähers
- Längenzugabe
- Manschette Zugabe
- Manschette drapieren
- Manschette schmaler Knopf
- Manschettenknopfreihen
- Manschettenlänge
- Manschettenstil
- Offset der Armkugel Q1
- Offset der Armkugel Q2
- Offset der Armkugel Q3
- Offset der Armkugel Q4
- Passenhöhe
- Runder Rücken
- Rückenweitenverhältnis
- Saumkurve
- Saumstil
- Schnittkonstruktion für Oberbrustumfang
- Schulter Zugabe
- Schulternahtverschiebung: Armlochseite
- Schulternahtverschiebung: Kragenseite
- Separate Knopfleiste
- Separate Knopfleiste
- Separate Knopflochleiste
- Separate Knopflochleiste
- Taillenzugabe
- Tiefenfaktor des Armloches
- Verringerung der Schulterneigung
- Vordere Abnäher
- Winkel des Brustabnähers
- Zugabe Hüfte
- Zusätzlicher Ausschnitt am vorderen Armloch
- Zusätzlicher oberer Knopf
- Ärmel Längenzugabe
- Ärmelleiste Breite
- Ärmelleistenlänge
- Simone Shirt: Erforderliche Maße
- Simone Shirt: Schnittanleitung
- Simone Shirt: Was du brauchst
Sven, der Pullover
- Sven Sweatshirt: Anleitung zum Nähen
Sven Sweatshirt: Design Optionen
- Armkugel Hinten X
- Armkugel Hinten Y
- Armkugel Oben X
- Armkugel Oben Y
- Armkugel Q1 Spreizung nach oben
- Armkugel Q1 Spreizung nach unten
- Armkugel Q2 Spreizung nach oben
- Armkugel Q2 Spreizung nach unten
- Armkugel Q3 Spreizung nach oben
- Armkugel Q3 Spreizung nach unten
- Armkugel Q4 Spreizung nach oben
- Armkugel Q4 Spreizung nach unten
- Armkugel Vorne X
- Armkugel Vorne Y
- Armkugel Zugabe
- Armlochtiefe
- Ausschnitt im Nacken
- Bizeps Zugabe
- Brustumfangszugabe
- Bündchen
- Bündchen-Elastizität
- Bündchen-Höhe
- Garantie der Ärmelbreite
- Kragen Zugabe
- Legacy Armlochtiefe
- Längenzugabe
- Manschette Zugabe
- Offset der Armkugel Q1
- Offset der Armkugel Q2
- Offset der Armkugel Q3
- Offset der Armkugel Q4
- Rückenweitenverhältnis
- Schnittkonstruktion für Oberbrustumfang
- Schulter Zugabe
- Schulternahtverschiebung: Armlochseite
- Schulternahtverschiebung: Kragenseite
- Tiefenfaktor des Armloches
- Verringerung der Schulterneigung
- Zugabe Hüfte
- Zusätzlicher Ausschnitt am vorderen Armloch
- Ärmel Längenzugabe
- Sven Sweatshirt: Designer Notes
- Sven Sweatshirt: Erforderliche Maße
- Sven Sweatshirt: Schnittanleitung
- Sven Sweatshirt: Stoff Optionen
- Sven Sweatshirt: Was du brauchst
Teagan, das T-Shirt
- Teagan-T-Shirt: Anleitung zum Nähen
Teagan-T-Shirt: Design Optionen
- Armkugel Hinten X
- Armkugel Hinten Y
- Armkugel Oben X
- Armkugel Oben Y
- Armkugel Q1 Spreizung nach oben
- Armkugel Q1 Spreizung nach unten
- Armkugel Q2 Spreizung nach oben
- Armkugel Q2 Spreizung nach unten
- Armkugel Q3 Spreizung nach oben
- Armkugel Q3 Spreizung nach unten
- Armkugel Q4 Spreizung nach oben
- Armkugel Q4 Spreizung nach unten
- Armkugel Vorne X
- Armkugel Vorne Y
- Armkugel Zugabe
- Armlochtiefe
- Ausschnitt im Nacken
- Ausschnittbreite
- Ausschnitttiefe
- Bequemlichkeitszugabe Ärmel
- Brustumfangszugabe
- Garantie der Ärmelbreite
- Krümmung Halsausschnitt
- Kurve zur Taille
- Legacy Armlochtiefe
- Längenzugabe
- Offset der Armkugel Q1
- Offset der Armkugel Q2
- Offset der Armkugel Q3
- Offset der Armkugel Q4
- Rückenweitenverhältnis
- Schnittkonstruktion für Oberbrustumfang
- Taillenzugabe
- Tiefenfaktor des Armloches
- Verringerung der Schulterneigung
- Zugabe Hüfte
- Zusätzlicher Ausschnitt am vorderen Armloch
- Ärmellänge
- Teagan-T-Shirt: Designer Notes
- Teagan-T-Shirt: Erforderliche Maße
- Teagan-T-Shirt: Schnittanleitung
- Teagan-T-Shirt: Stoff-Optionen
- Teagan-T-Shirt: Was du brauchst
Tristan top
- Tristan Top: Cutting Instructions
Tristan top: Design Options
- Armlochtiefe
- Brustumfangszugabe
- Büstenumfang leicht
- Depth of the cut in the back
- Depth of the cut in the front
- Hem Size
- Hem option
- Hohe Büstenbreite
- Lacing option
- Lacing width
- Länge des Taillenabnähers
- Obere Abnäherlänge
- Peplum Size
- Peplum fullness
- Peplum option
- Platzierung Reißverschluss
- Riemenbreite
- Roundness of the cut in the back
- Roundness of the cut in the front
- Schulter Abnäher Position
- Schulter-zu-Schulter-Erleichterung
- Taillenzugabe
- Verringerung der Brustumfangszugabe
- Vordere Schulterbreite
- Waist dart position
- Zipper location
- Tristan top: Designer Notes
- Tristan top: Fabric Options
- Tristan top: Required Measurements
- Tristan top: Sewing Instructions
- Tristan top: What You Need
Umbra Unterhosen
Umbra Unterhosen: Design Optionen
- Absenkung der vorderen Taille
- Absenkung hintere Taille
- Anstand zwischen den Taschen
- Beinhöhe
- Elastikband-Dehnung
- Hintere Freilegung
- Horizontale Stoffdehnung
- Minimale Stoffbreite
- Schrittnaht
- Sitz
- Taschen
- Taschen-Höhe
- Verkleinerung der Vorderseite
- Verlauf der Rückentaillenkurve
- Verlauf der vorderen Taillenkurve
- Vertikale Stoffdehnung
- Vordere Freilegung
- Wölbung
- Wölbungs-Fülle
- Zwickelbreite
- Zwickelposition
- Umbra Unterhosen: Designer Notes
- Umbra Unterhosen: Erforderliche Maße
- Umbra Unterhosen: Schnittanleitung
- Umbra Unterhosen: Stoff Optionen
- Umbra Unterhosen: Was du brauchst
Wahid, die Weste
- Wahid Weste: Designer Notes
- Wahid Weste: Stoff Optionen
- Wahid-Weste: Anleitung zum Nähen
Wahid-Weste: Design Optionen
- Abnäher in der hinteren Mitte
- Anzahl der Knöpfe
- Armlochtiefe
- Ausschnitt Tiefe
- Ausschnittstil
- Brustumfangszugabe
- Legacy Armlochtiefe
- Längenzugabe
- Nackenauschnitt
- Paspelhöhe
- Rückseite Ausschnitt
- Rückwärtige Armlochabnäher
- Saumradius
- Saumstil
- Schnittkonstruktion für Oberbrustumfang
- Schulterversatz nach innen
- Taillenzugabe
- Taschenbreite
- Taschenplatzierung
- Tiefenfaktor des Armloches
- Vorderer Armlochabnäher
- Vorderseite Ausschnitt
- Winkel der Tasche
- Zugabe Hüfte
- Wahid-Weste: Erforderliche Maße
- Wahid-Weste: Schnittanleitung
- Wahid-Weste: Was du brauchst
Waralee, die Wickelhose
- Waralee Wickelhose: Anleitung zum Nähen
Waralee Wickelhose: Design Optionen
- Beingröße
- Fronttasche Stil
- Hintere Anstieg
- Hinterer Schritt
- Horizontaler hinterer Schritt Faktor
- Horizontaler vorderer Schritt Faktor
- Knot position
- Knoten vorne
- Mini anzeigen
- Rückwärtige Tasche
- Saumgröße
- Separates Taillenband
- Taille anpassen
- Taillenbund
- Taillenhöhe
- Verkürzung des Hosenbeins
- Vertikaler hinterer Schritt Faktor
- Vertikaler vorderer Schritt Faktor
- Vordere Taschen
- Vorderer Schritt
- Übertritt an der Taille
- Waralee Wickelhose: Designer Notes
- Waralee Wickelhose: Erforderliche Maße
- Waralee Wickelhose: Schnittanleitung
- Waralee Wickelhose: Stoff Optionen
- Waralee Wickelhose: Was du brauchst
Yuri, der Hoodie
- Yuri Hoodie: Anleitung zum Nähen
Yuri Hoodie: Design Optionen
- Armkugel Hinten X
- Armkugel Hinten Y
- Armkugel Oben X
- Armkugel Oben Y
- Armkugel Q1 Spreizung nach oben
- Armkugel Q1 Spreizung nach unten
- Armkugel Q2 Spreizung nach oben
- Armkugel Q2 Spreizung nach unten
- Armkugel Q3 Spreizung nach oben
- Armkugel Q3 Spreizung nach unten
- Armkugel Q4 Spreizung nach oben
- Armkugel Q4 Spreizung nach unten
- Armkugel Vorne X
- Armkugel Vorne Y
- Armkugel Zugabe
- Armlochtiefe
- Ausschnitt im Nacken
- Bizeps Zugabe
- Brustumfangszugabe
- Garantie der Ärmelbreite
- Kragen Zugabe
- Legacy Armlochtiefe
- Längenzugabe
- Manschette Zugabe
- Offset der Armkugel Q1
- Offset der Armkugel Q2
- Offset der Armkugel Q3
- Offset der Armkugel Q4
- Rückenweitenverhältnis
- Schnittkonstruktion für Oberbrustumfang
- Schulter Zugabe
- Schulternahtverschiebung: Armlochseite
- Schulternahtverschiebung: Kragenseite
- Tiefenfaktor des Armloches
- Verringerung der Schulterneigung
- Zugabe Hüfte
- Zusätzlicher Ausschnitt am vorderen Armloch
- Ärmel Längenzugabe
- Yuri Hoodie: Designer Notes
- Yuri Hoodie: Erforderliche Maße
- Yuri Hoodie: Schnittanleitung
- Yuri Hoodie: Stoff Optionen
- Yuri Hoodie: Was du brauchst
Messungen, die wir verwenden
- Abstand zwischen den Brustpunkten
- Brustpunkt zu Unterbrust
- Fersenumfang
- Gesäßumfang
- Gesäßweite hinten
- HPS zu Brust
- HPS zu Taille hinten
- HPS zu Taille vorne
- Halsweite
- Handgelenksumfang
- Hüfttiefe (Taille bis Gesäß)
- Hüftweite
- Knieumfang
- Knöchelumfang
- Kopfumfang
- Oberarmweite
- Oberbrustweite
- Oberschenkelumfang
- Oberweite
- Schritthöhe
- Schrittlänge
- Schulter bis Ellenbogen
- Schulter bis Handgelenk
- Schulter zu Schulter
- Schulterneigung
- Taille bis Achselhöhle
- Taille bis Boden
- Taille bis Knie
- Taille bis Oberschenkel
- Taille bis Unterbrustweite
- Taille zur Hüfte
- Taille-Schritt-Taille Maß
- Taillenumfang
- Taillenweite hinten
- Unterbrustumfang
- Vordere Oberbrustweite
- Vordere Oberweite
- Vorderer Taille-Schritt Abstand
Über FreeSewing
- Erste Schritte mit FreeSewing.org
- Deine Rechte als FreeSewing-Nutzer
- FreeSewing Datenschutzhinweis
- Gemeinschaftsstandards
Häufig gestellte Fragen
- I'm having trouble with measurements. What should I check?
- Kann ich FreeSewing-Schnittmuster für kommerzielle Zwecke verwenden?
- Warum sind die Nahtzugaben abgeschrägt?
- Warum verwendet ihr keine doppelten Knipse, um die Rückseite des Schnittes zu markieren?
- Warum veröffentlicht ihr überhaupt Grundschnitte für Damenkleidung? Sie sind [hier starke Meinung einfügen].
- Where did the "standard" measurements go?
- Why are seam allowances not included by default?
- Wie kann ich mich registrieren? Ich habe nie eine E-Mail zur Aktivierung meines Accounts erhalten!
- Schnittmuster-Notation
- Terminology
- Dokumentation
- FreeSewing Designs
- Tristan top
- Tristan top: Sewing Instructions
Tristan top: Sewing Instructions
Table of contents
- Step 1: Cut your pieces
- Step 2: Sew the back inside parts together at center back
- Step 3: Attach back outside parts
- Step 4: Attach front outside parts at the side seams
- Step 5: Attach front inside parts
- Step 6: Sew at the shoulders
- Step 7: Repeat with lining fabric
- Step 8: Begin the closure by sewing down center front
- Step 9: Sew your first boning channel
- Step 10: Sew your second boning channel
- Step 11: Insert your boning
- Step 12: Install your eyelets
- Step 13: Bind and lace up your top
- Schritt 14: Du bist fertig!
There are many ways to sew a Tristan
These instructions are for a lined Tristan top with a center-front lacing closure and bias binding at the neckline, armhole, and hem.
Step 1: Cut your pieces
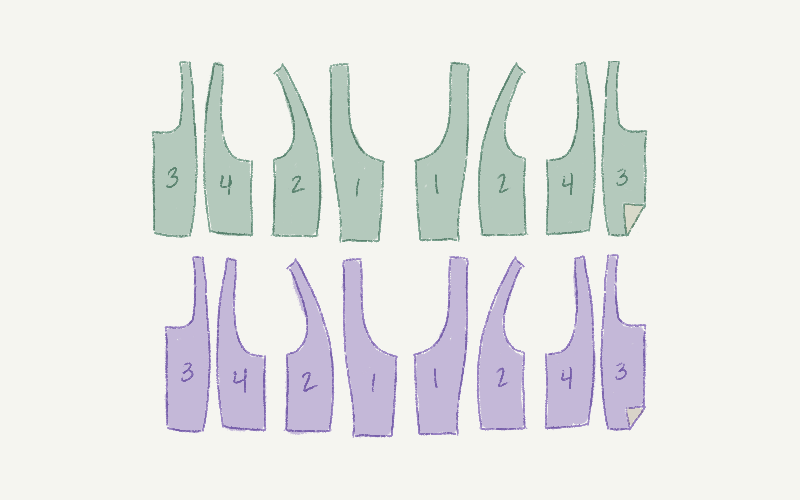
Cut your pattern pieces. If you would like to add embroidery or other decoration, now is a good time to do so.
Finishing methods affect the seam allowance
If using bias binding, you should cut the neckline and armholes without seam allowance.
Step 2: Sew the back inside parts together at center back
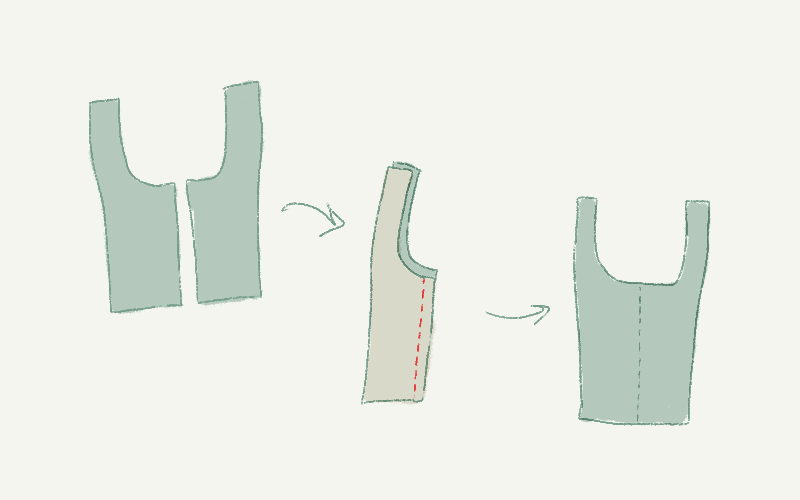
Align the back inside (Part 3) parts at center back. Sew them together with good sides together.
Step 3: Attach back outside parts
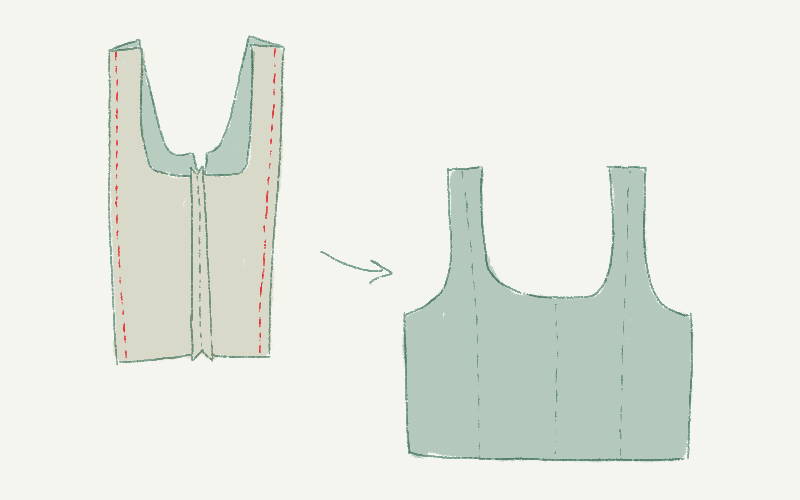
Attach one back outside (Part 4) part to its matching back inside (Part 3) part, good sides together, making sure to match any notches.
Do the same for the other back outside (Part 4) part.
Step 4: Attach front outside parts at the side seams
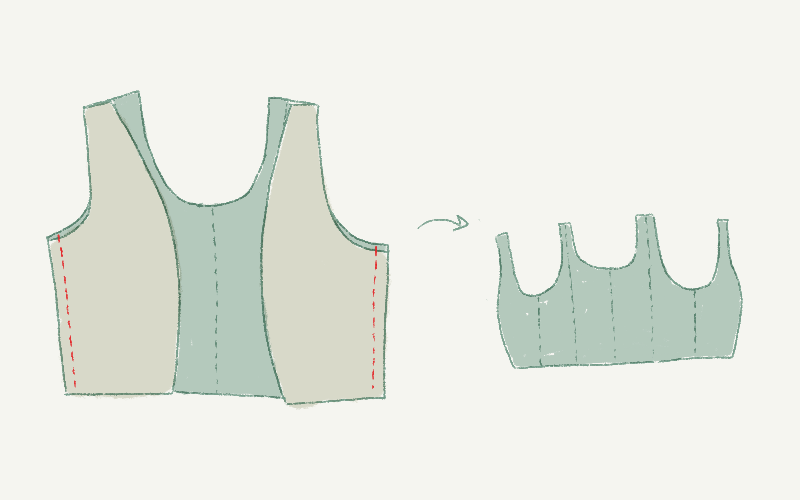
Attach one front outside (Part 2) part to its matching back outside (Part 3) part, good sides together.
Do the same for the other front outside (Part 2) part.
Step 5: Attach front inside parts
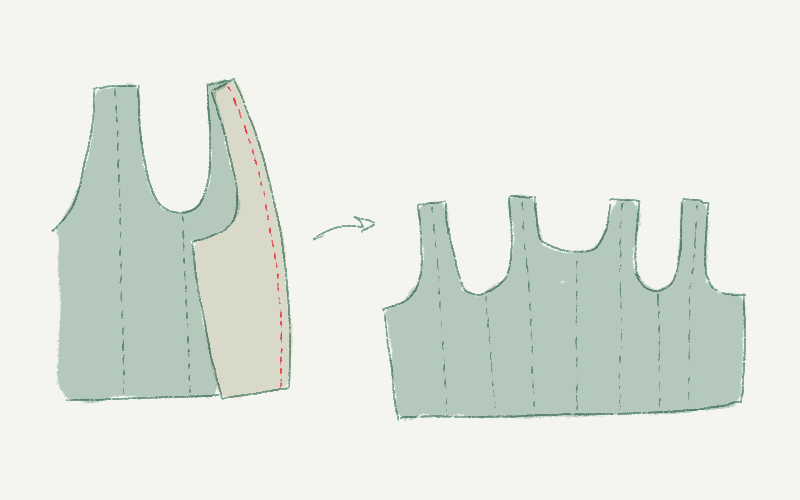
Finally, attach one front inside (Part 1) part to its matching front inside (Part 2) part, good sides together.
Do the same for the other front inside (Part 1) part.
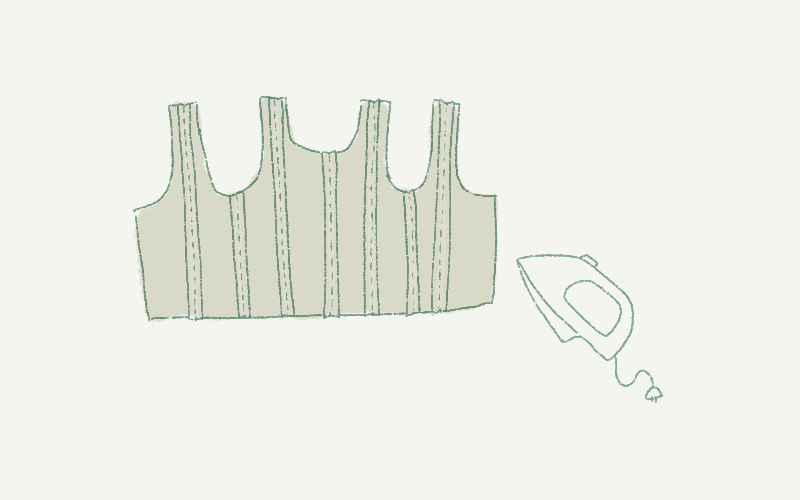
Press all the seam allowances flat.
Step 6: Sew at the shoulders
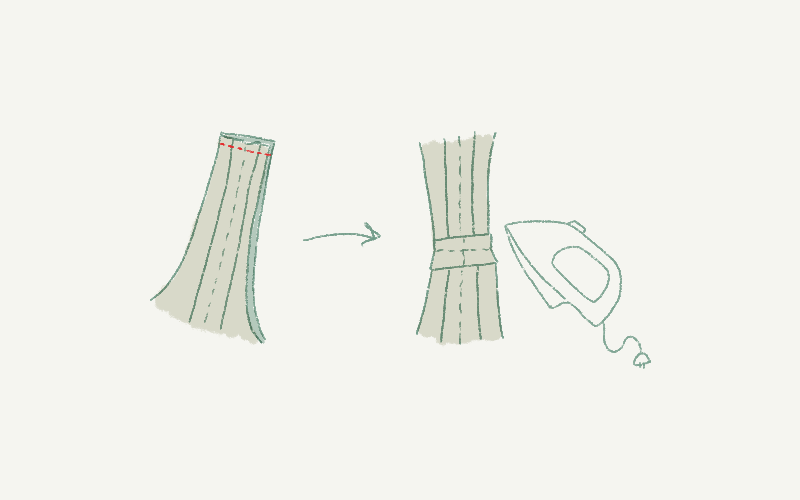
Sew at the shoulders to complete each armhole. Sew good sides together.
Drücken Sie die Nahtzuschläge offen.
Check the fit
This is a good time to try on your garment and make any small adjustments. For example, if your shoulders have a different slope, you could make one shoulder strap a little shorter.
Step 7: Repeat with lining fabric
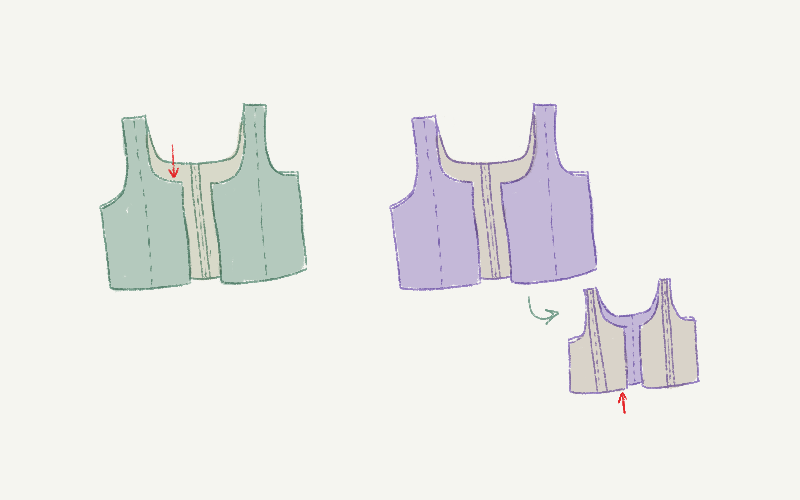
Repeat Steps 1 through 6 with your lining fabric.
You will now have two identical pieces, one with your main fabric and one with your lining.
Turn your lining piece inside out.
The red arrows in the illustration are to help you identify the center insides in the next step.
Step 8: Begin the closure by sewing down center front
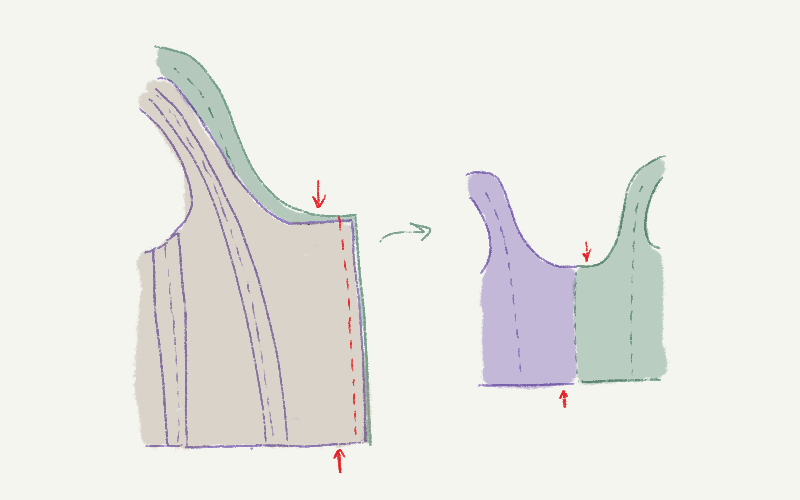
Place the center insides of the main and lining together, good sides together. This will become one side of your front opening.
Sew down center front.
Öffne die Naht flach.
Step 9: Sew your first boning channel
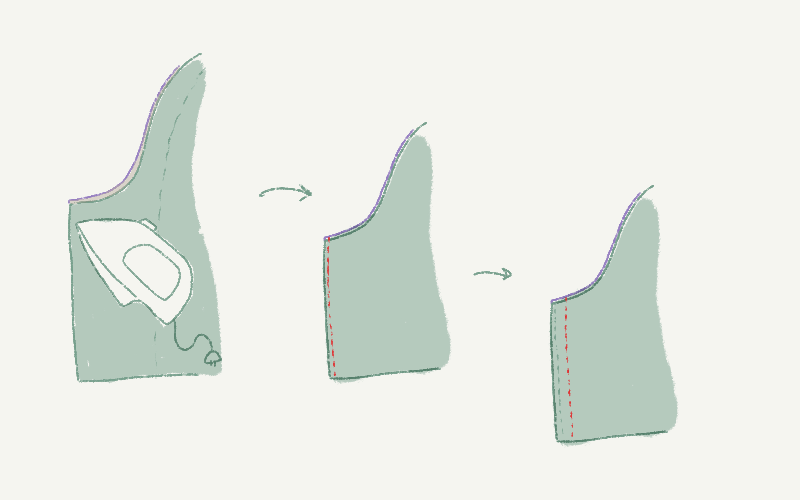
Turn right side out — that is, put the two pieces together, bad sides together — and press.
Sew 2 mm (0.1 inch) in from center edge.
Allow enough space for your boning, then sew again.
Repeat Steps 8 through 10 on the other side.
Leave enough room for your boning
Leave enough wiggle room to allow you to insert your boning. You want the channel to be snug, but not too tight.
Step 10: Sew your second boning channel
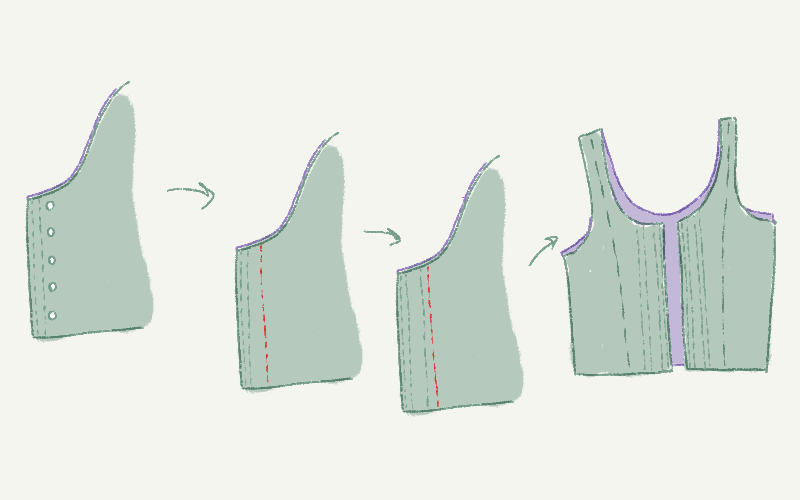
Mark the locations of your eyelets. Allow enough space to install these later, then sew again.
Allow enough space for another row of boning, then sew again.
Wiederholen auf der anderen Seite.
Step 11: Insert your boning
Cap your boning if appropriate for the type of boning used. Then insert boning in the boning channels.
Step 12: Install your eyelets
Install your eyelets between the two boning channels.
Step 13: Bind and lace up your top
Apply bias binding to the neck hole, armholes, and hem.
Lace up your top.
Schritt 14: Du bist fertig!
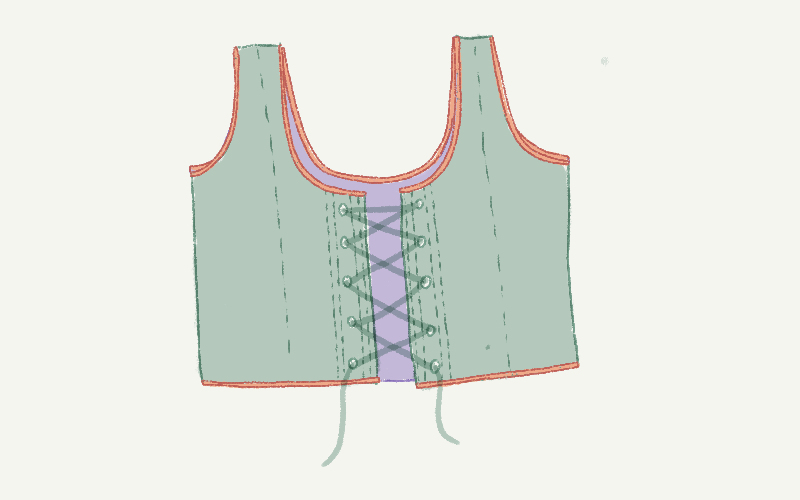
Enjoy your Tristan top!
Contents by
- Authors:
- Maintainers:
- Last updated: 14 days, 15 hours ago
Table of contents
- Step 1: Cut your pieces
- Step 2: Sew the back inside parts together at center back
- Step 3: Attach back outside parts
- Step 4: Attach front outside parts at the side seams
- Step 5: Attach front inside parts
- Step 6: Sew at the shoulders
- Step 7: Repeat with lining fabric
- Step 8: Begin the closure by sewing down center front
- Step 9: Sew your first boning channel
- Step 10: Sew your second boning channel
- Step 11: Insert your boning
- Step 12: Install your eyelets
- Step 13: Bind and lace up your top
- Schritt 14: Du bist fertig!